


If you are using Squarespace and looking forward to moving towards WordPress, congratulations you are in the right place. In this detailed write up, we will try to focus on the entire process to guide you through transferring the Squarespace domain to WordPress. Let’s get started with the step by step guide to transfer Squarespace domain to WordPress.
Step 1: The First Step
The very first step will be to sign up for a new web hosting account and register a domain name for your website. In order to get a domain, our recommendation will be to use a platform that is compatible with WordPress. To begin with, you can consider using Bluehost to get your domain name as they are officially recommended by WordPress as a hosting provider.
Your Squarespace website might have a domain name of its own. In that case, you will be required to transfer that domain to a new website hosting as well. After the domain transfer is completed, access to the domain will be granted as a built-in Squarespace subdomain.
Step 2: Getting Started with WordPress
Once you are signed up with a web host, the following steps are to set up or install WordPress. WordPress is compatible with all of the web host providers and you can easily set up WordPress in a few minutes. It comes with very easy to install features that are beneficial for professionals and newbies alike.
If you use Bluehost, then WordPress will be installed automatically with it. It will save your time and effort at the same time. In case of the other hosting providers, they also provide the option to install WordPress in a few clicks and set up WordPress in your hosting. After the WordPress installation is completed, it will give you access to the admin panel and you can have a detailed overview of the WordPress site from the dashboard.
Step 3: Export Content from Squarespace
Once the installation of the WordPress theme is completed, the next point of action will be to export the content that is in Squarespace. However, there are some limitations when it comes to exporting contents from Squarespace. It does not allow exporting all the contents that are present on the website. You can only export a few specific contents, and the remaining contents that cannot be exported from the website have to be copy pasted to the WordPress site manually.
To make it easier for you to understand, we are listing the type of contents you can export directly from Squarespace. The contents that are not on this list, has to be exported manually.
- Basic pages of your current website can be exported as WordPress pages.
- From the blog, once a blog page can be exported. The exported blog page will appear in WordPress pages as a blog.
- The blog posts that were in the blog page will be automatically exported as well.
- Gallery pages can be exported to WordPress.
- Text, images and embedded blocks can be exported.
The above-mentioned contents and elements you can export from the Squarespace website. In the following, we will list down the type of content that cannot be exported from Squarespace.
- Pages with product, album, events.
- Blocks with audio, video and products.
- Style changes and custom CSS.
- Folders and index pages cannot be exported.
- Blog page export is limited to one page. You cannot export more than that.
From the above points, you can get an idea of the extent you can export contents from Squarespace. So note down what contents you can export and what you cannot. Based on that, create a backup source of the contents that cannot be exported so that you can use them on the new WordPress website when it is ready.
In the following we will elaborate how you can get started with exporting contents from Squarespace for your WordPress site.
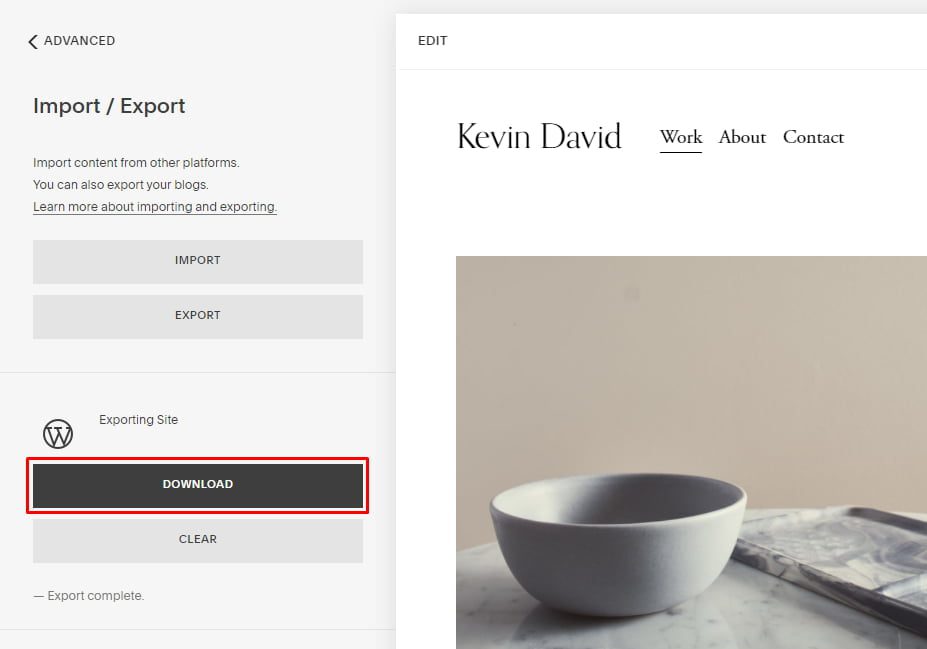
Firstly, log in to your Squarespace and then proceed to Settings » Advanced » Import/ Export menu.

After clicking on this option, it will lead you to the following page. This page is called the import/export setting page. From the page click on the export button to keep going with the import process.

After clicking on this, the site will generate a popup. It will give you two options to pick from. You can either export your pages and blogs to WordPress or you can download a .csv file of your products. From this pop up, click on the WordPress icon to continue with the process.

After clicking, the exporting will start. You can check the progress of the export and once it is completed a tab will appear with the option to download the files that have been compiled. You will have to download the file on your computer or device because it will be necessary for transferring to WordPress.
Once you have downloaded, your exporting process with Squarespace is completed. Now, let’s move on to the next discussion on how to import content from Squarespace to WordPress.
Step 4: Import Content from Squarespace to WordPress
The next step is to import the content you downloaded from Squarespace into your WordPress site. Login in to your WordPress admin area and go to Tools » Import page. You will see a list of platforms to choose from.
Squarespace will not be listed there because it exports content in a WordPress compatible XML file format. This means you need to click on the ‘Install now’ button below WordPress to continue.
In this step you will be required to import the downloaded contents to your WordPress website. In order to do that you will have to do the following:
- Login to your WordPress admin panel and go to the Tools > Import page.
It will show you the list of sources from where you can import the contents. However, Squarespace will not be mentioned in this section and that is how it is designed. Because, WordPress imports only WordPress compatible XML files. In order to start the process, click on the “Install Now” button below the WordPress section.
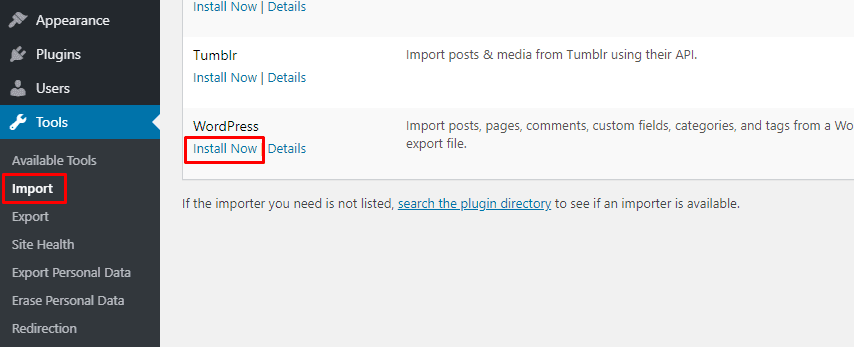
After clicking on the “Install Now“ button WordPress will install the importer. After the process is completed, a new “Run Importer“ option will appear in the section below WordPress. Click on the “Run Importer“ option to carry on the process.

After completion of this, the site will lead to a new page with the following details. The details will consist of an option to allow you to choose a file from your device.
- Click on the “Choose File” option and upload the file that you have downloaded from Squarespace.
After you choose the file and complete the upload, WordPress will examine the file and if the files are okay then it will direct to the import setting page. From the import setting page you will have the freedom to choose the author name for the content you have imported. With WordPress you have the opportunity to import the users you had over Squarespace and enlist them as subscribers to your website. Plus, you have the freedom to choose from the existing roles or create a new user from scratch.
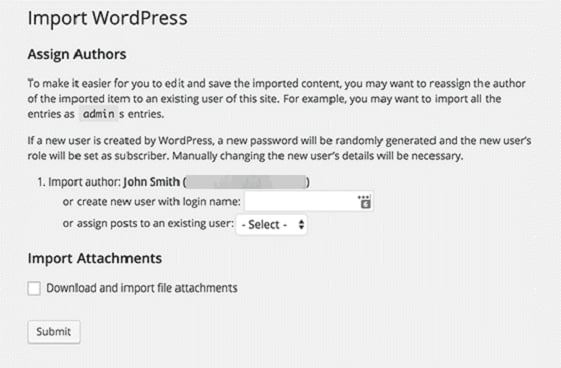
When you are done with inputting the admin information, click on the “submit” button. After you click the Submit button, WordPress will start importing contents from the Squarespace file. After the process is completed, you will receive a success message. You can navigate to the WordPress site to see the imported contents.
Note: You will see an option to import images from your Squarespace website, but many face difficulty with that process. We will show how you can import images from your Squarespace website to WordPress website in the later part of the article.
Step 5: How to Import Images from Squarespace
The WordPress importer feature does not successfully complete the import of images from Squarespace. The process can be easily done through the help of another plugin. In order to go through the process easily, the first thing should be done is to download the Auto Upload Images plugin. You can have a look at our step by step guide of installing WordPress plugin.
After the plugin is installed and activated, you will have to edit the posts and pages that have images. Once you configure, this plugin will do the rest. With this WordPress plugin you can update contents at bulk. This plugin will allow you to complete the task in a few clicks instead of doing it manually.
To get started with the process, you need to go to the Post section and click on the “All Post Page“. From their click on the Screen Options at the top.

You need to increase the number to 999 in the ‘Number of items per page field’ field and click on the Apply button. WordPress will reload the page, and this time it will show 999 posts at a time. Next, you need to select all your posts and then select Edit under the bulk actions menu.
From the screen options, go to the “number of items per page field“ and increase the number to 999 and click on the “Apply” button. After that, WordPress will reload the page and it will show 999 posts together. Then select all posts and then click “Edit” under the bulk action menu.

Then click on the “Apply“ button. WordPress will then take you to a quick edit box where all the posts will be selected. Simply click on the “Update” button and the plugin will start importing external images from your Squarespace website and bring them to your WordPress media library.
Step 6: Importing Other Contents from WordPress
As we have already mentioned that Squarespace does not allow to import all the contents, there will be some contents that will be left out. The rest of the contents has to be imported manually from the Squarespace website. It can be the products, audio and video etc. Once you include the rest of the content manually, your website will be ready to go with the necessary contents. Gradually, based on that you can increase the overall contents of your website and keep ongoing.
Through this process, you will be able to transfer Squarespace domain to WordPress easily along with the majority of the content. If you liked our content, please have a look at our blog for more contents.


