


What Is Service Host Superfetch? How to Disable It?

What is SuperFetch?
Back in the time when people use to use Windows 8 there was a certain issue that popped up and created great concern for windows 10 users too. This issue is known as System Host: Local System, and it can be found when you opened your task manager and find this system host is eating up the CPU usage and taking up the reading and writing capacity of your computer. Don’t mistake it as bloatware or something really unnecessary; rather there are many programs that run under that application. It’s created from Windows system support known as SuperFetch; this is something that Microsoft claims to improve the efficiency of the windows. Now that we are stuck between both of them, where do we go, and how do we fix it? Let’s have a look at how to fix service host superfetch.
This is basically an application that copies all the commonly used apps into the RAM so that they boot up faster the next time you use it. If your hardware isn’t up to date, this will start to eat up the spaces causing more disk usage and lead to a bitter experience for the user. Adding to that, service host superfetch also runs in the background silently.

What is the Solution to Service Host SuperFetch?
Solution No. 1:
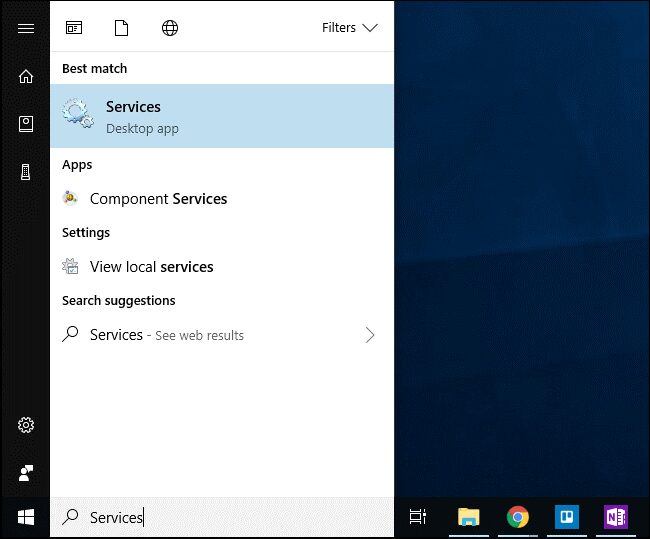
Disable this from your service windows. Navigate to Services from the start menu or you can search Services from the search box or you can also press Windows+R and type “services.msc“.
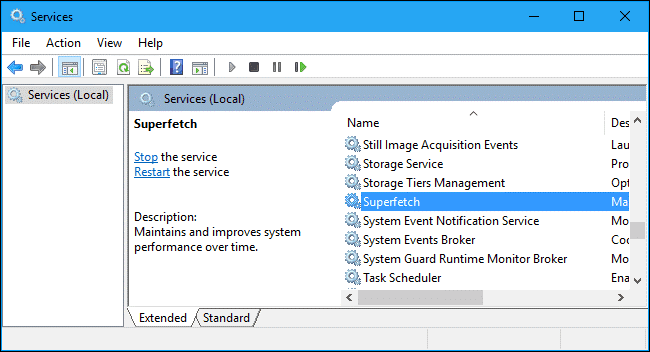
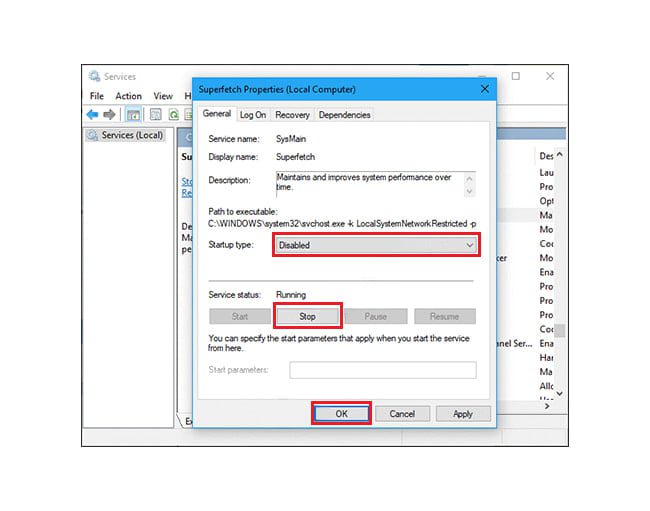
After that, scroll down to the list of services, and double-click the “Superfetch“. To prevent the service from automatically launching when Windows starts, click the “Startup Type” dropdown, and then select the “Disabled“ option.
Click the “Stop“ button to shut down the service, and then click “OK“ to save your changes. After doing all these things don’t forget to give a full system reboot and thus the problem with service host superfetch will be fixed.
Solution No. 2:
Disable Superfetch Using Registry to solve service host superfetch issue.
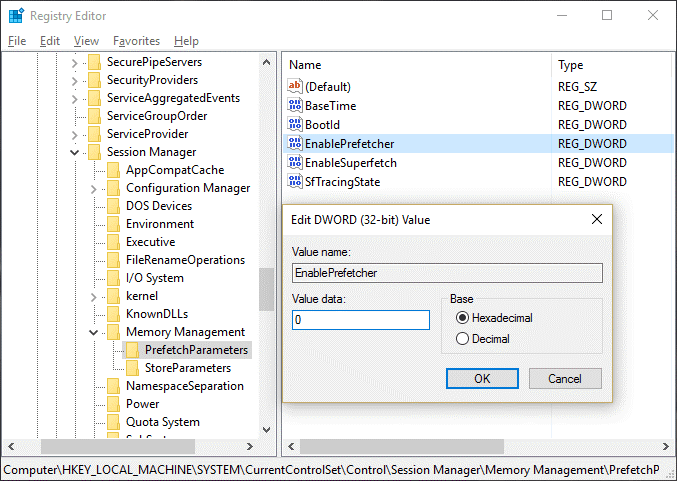
Press Windows Key + R then type regedit and hit Enter to open Registry Editor.

Navigate to the following registry key:
HKEY_LOCAL_MACHINE\SYSTEM\CurrentControlSet\Control\Session Manager\Memory Management\PrefetchParameters
Ensure you have selected PrefetchParameters then in the right window double click on EnableSuperfetch key and change its value to 0 in the value data field. After that click on close Registry and reboot your system.
Solution No. 3:
Run the system file checker to solve service host superfetch
Go to Start menu and type cmd right click on it and run it as an administration. In the command prompt, type “sfc /scannow“, wait for the scan to complete and after that Enter the command DISM /Online /Cleanup-Image /RestoreHealth. After this command finishes running, monitor your CPU and Memory load and then check if the issue still exists.
Solution No. 4:
Killing SVChost and solving service host superfetch.
Killing the Service Host process in the Task Manager solves this issue. After this, try download your pending updates with an unmetered Wi-Fi connection.
Firstly, open the task manager, expand it by clicking more details. Look for “Service Host: Local System” and end the task. As the dialog box shows up showing the confirmation, check Abandon unsaved data and shut down and click Shut down. After that don’t forget to reboot the system.
Solution No. 5:
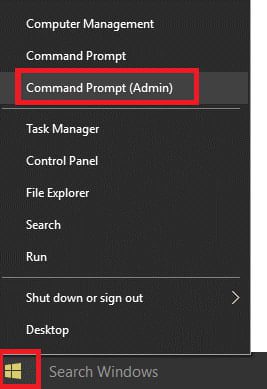
Using Command Prompt to solve service host superfetch
Press Windows Key + X then click on Command Prompt (Admin).
Then type Sfc /scannow and if that doesn’t work hit sfc /scannow /offbootdir=c:\ /offwindir=c:\windows. Wait for the process to finish and after that reboot and PC and open Command Prompt again and hit enter after typing the following:
- DISM /Online /Cleanup-Image /CheckHealth
- DISM /Online /Cleanup-Image /ScanHealth
- DISM /Online /Cleanup-Image /RestoreHealth


After that let the DISM command run and wait for it to finish. If this process doesn’t work try this: DISM /Image:C:\offline /Cleanup-Image /RestoreHealth /Source:c:\test\mount\windows or Dism /Online /Cleanup-Image /RestoreHealth /Source:c:\test\mount\windows /LimitAccess
Note: Replace C:\RepairSource\Windows with the location of your repair source.
After that reboot your PC and check if the service host superfetch problem is fixed or not.
Solution No. 6:
Change Processor Scheduling and fix service host superfetch issue
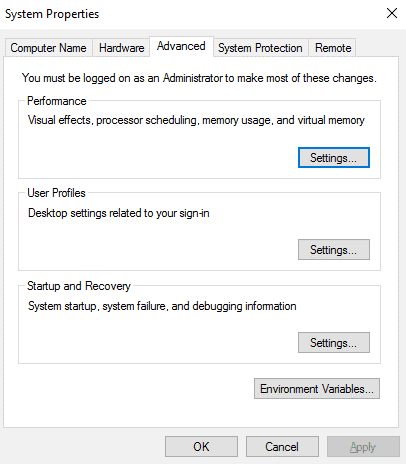
Press Windows Key + R then type sysdm.cpl and hit Enter to open System Properties. Switch to the Advanced tab and click On Settings under Performance. switch to the Advanced tab under Performance Options. Under Processor scheduling select Program and click Apply followed by OK. Reboot your PC to save changes.


Solution No. 7:
Solving service host superfetch by Disabling Background Intelligent Transfer Service.
In order to solve service host superfetch with this method, press Windows Key + R then type msconfig and hit Enter. Switch to services tab then uncheck “Background Intelligent Transfer Service“. Click OK then click Apply.


Solution No. 8:
Troubleshoot Windows Update to solve service host superfetch.
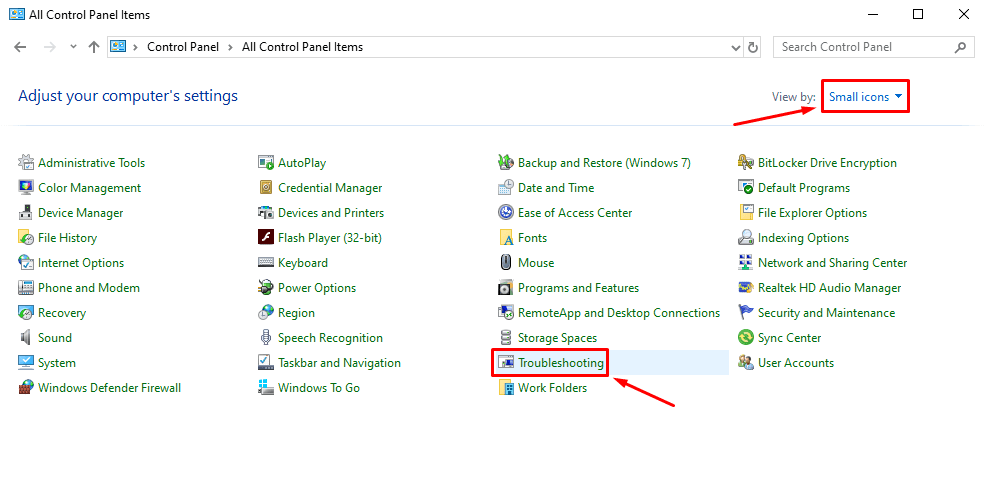
Windows updates are a part of the whole Microsoft experience. Through this, they release updates, patches, and other improvements. In Windows 10, windows 10 update is an integrated part of the system and it’s set to automatic which causes a huge load to the system whenever the update occurs. For this, you can run the Troubleshooter by clicking on the control panel, selecting view by small icons, and clicking ‘‘troubleshooting’’ in the top right corner. To ensure that your Microsoft systems are running optimally, collaborating with Microsoft consulting services can help address complex issues and provide tailored solutions for system updates and maintenance.
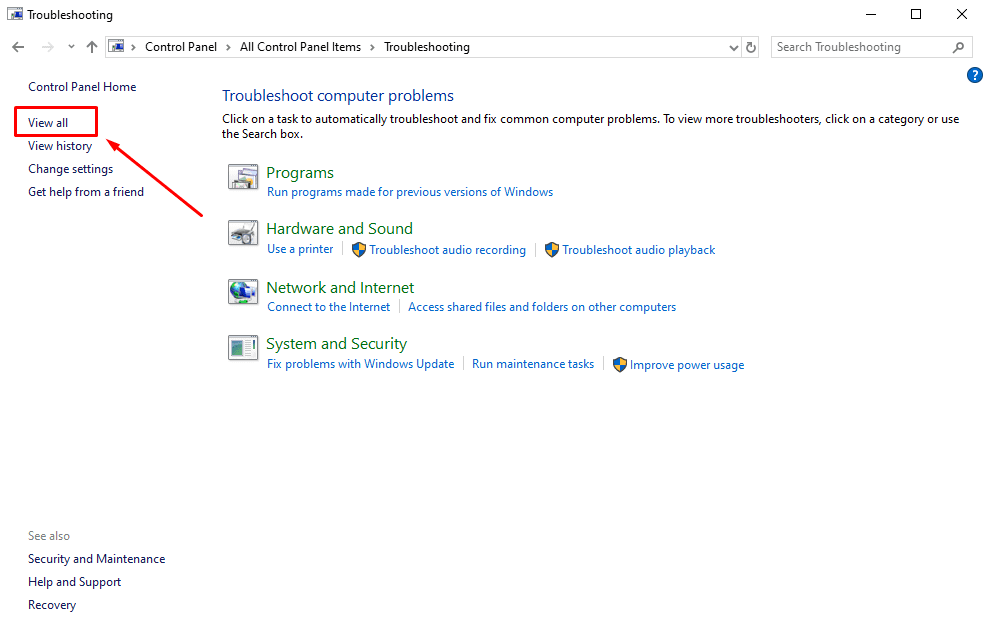
In Troubleshooting, window find “View all” on the left pane and click on it. Now you will see a list of computer problems that you can troubleshoot. Find “Windows Update” and right-click on it, and select “Run as administrator” from the dropdown menu. In the Windows Update window, click “Advanced” and check the “Apply repairs automatically” checkbox. Click “Next” and follow the instructions on the screen to complete the troubleshooter.

These are the most well known and most used methods to overcome this problem. These are absolutely easy fixes service host superfetch as it may cause CPU overload resulting in lags, stutters, and even hardware heating issues. Follow the techniques mentioned above and we hope you will luckily find the ultimate solution and run your computer more smoothly without putting too much pressure.
If you enjoyed this article, please make a quick visit to your blogs for more informative content.


